2026-06-12
AI Model Product Scene Automation for Apparel Campaign Images
Automate apparel campaign images by defining the model, uploading the product, and letting AI plan suitable scenes and poses.
Try this workflow in Naviya
Turn a product, hook, or campaign idea into short social-ready ad concepts.
Create video ad variants
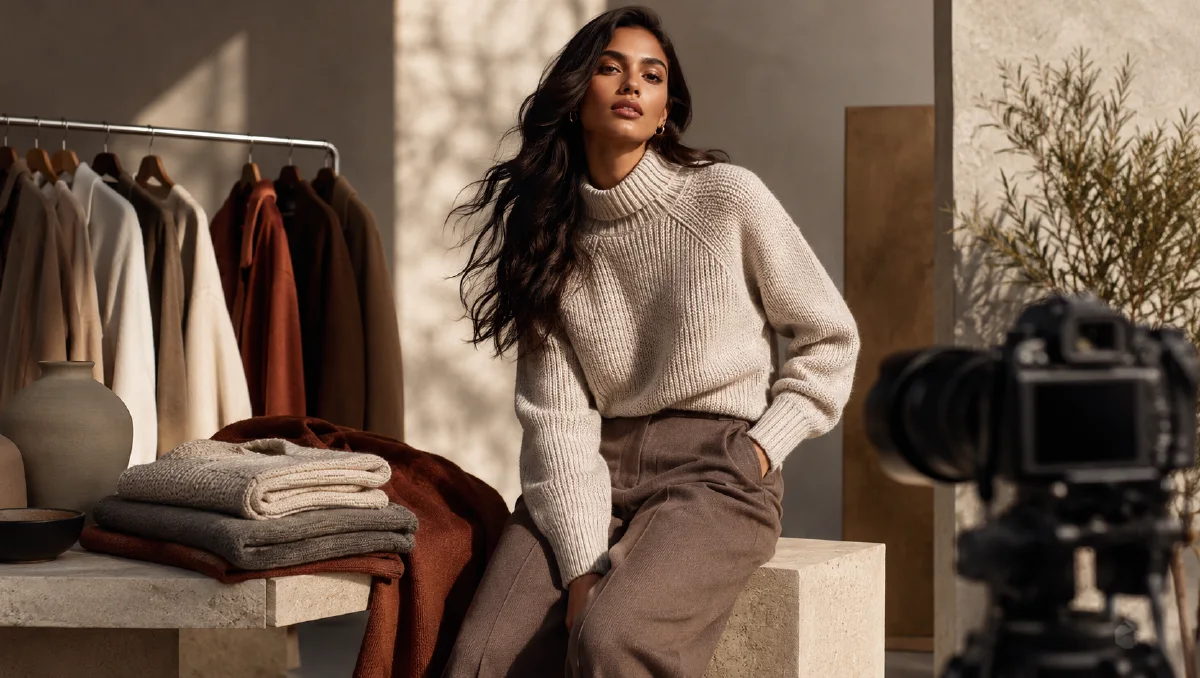
AI model product scene automation turns a clothing image into campaign-ready model photos by handling three parts of the shoot: who wears the product, what product is shown, and where the scene happens. This is the "model, product, scene" structure behind many scalable fashion workflows.
The method is valuable because fashion testing is expensive. Brands need model variety, product accuracy, scene diversity, and enough images for ecommerce, ads, and social. AI can create fast options when the inputs are clean and the workflow is controlled.
Use AI Image Generator to create the still images, Image to Video for short model clips, and AI Video Ads for campaign variants. Related guides include ecommerce AI model photos, multi-angle model references, AI flash fashion editorial workflow, and AI lookbook from single product image.
Definition
Model product scene automation is a workflow where:
- The model is defined by text or reference.
- The garment is provided as a product image.
- The scene is planned by AI based on product style.
- The final output shows the garment on the model in a believable environment.
This is not just virtual try-on. It is campaign image generation with styling, pose, and environment control.
Step 1: Define the model
Write a model profile that fits the buyer and brand. Keep the description specific enough to guide the image, but not so overloaded that the result becomes artificial.
Model profile template:
Age range:
Gender presentation:
Body type:
Skin tone:
Hair:
Facial features:
Pose attitude:
Brand mood:
Example:
Age range: early 30s.
Gender presentation: masculine.
Body type: lean, average height, relaxed posture.
Hair: short dark hair.
Facial features: natural, approachable, slight smile.
Pose attitude: casual confidence.
Brand mood: premium everyday outdoor lifestyle.
If you want a consistent brand model, generate several options first and reuse the best one as a reference across future products.
Step 2: Upload the product
Use a garment image with a clean background. Flat lays, hanger shots, and mannequin shots all work. The prompt should preserve the product:
Use the uploaded garment image as the clothing reference.
Preserve silhouette, fabric texture, color, pattern, seams, collar, cuffs, hem, and key construction details.
Fit the garment naturally on the model.
Do not invent logos, pockets, patterns, or closures.
If the product is a top, tell the AI what lower body styling should do. If the product is pants, define top and shoe styling. Otherwise the model may invent a distracting outfit.
Step 3: Let the scene match the product
Scene automation works best when the system reads the garment style and chooses a matching environment. A cozy knit can go into a warm living room or winter street. A technical jacket can go into a mountain trail or rainy commute. A satin dress can go into an evening interior.
Scene planning prompt:
Act as a fashion creative director.
Analyze the uploaded garment and propose three campaign scenes that match its style, season, and buyer.
For each scene, provide: location, pose, lighting, camera angle, styling accessories, and mood.
Avoid scenes that hide the garment.
Choose one scene and generate the final image.
Scene examples by category
Use the product category to narrow the environment:
| Garment | Scene direction | Why it works |
|---|---|---|
| Knit sweater | warm apartment, cafe window, winter street | Shows softness and seasonal comfort |
| Technical jacket | rainy commute, mountain road, city overpass | Connects features to use |
| Linen shirt | resort terrace, market street, sunny studio | Supports breathability and ease |
| Tailored pants | gallery, office lobby, clean street | Shows structure and fit |
| Evening dress | hotel corridor, low-lit interior, rooftop | Supports polish and occasion |
The scene should answer a shopper question. Where would I wear it? What does it feel like? Does it match my life?
Step 4: Create the model image
Final prompt:
Create a fashion campaign image.
Model: [model profile].
Garment: use the uploaded clothing image and preserve all garment details.
Scene: [chosen location and mood].
Pose: natural fashion pose that shows the garment clearly.
Camera: [full-body, half-body, three-quarter, walking shot].
Lighting: [soft daylight, flash editorial, sunset, studio, overcast street].
Style: polished fashion ecommerce campaign, realistic, premium.
Constraints: accurate garment fit, natural hands, no extra logos, no warped limbs, garment not hidden.
Generate three sets: one full-body, one medium crop, and one detail-focused image.
Step 5: Build a campaign set
Useful output mix:
| Image type | Purpose |
|---|---|
| Full-body | Shows fit and outfit |
| Medium crop | Product page and social |
| Detail | Fabric, collar, sleeve, texture |
| Lifestyle wide | Campaign banner |
| Alternate model | Audience testing |
This mix supports store pages and social campaigns without needing a full shoot.
Operating advice
Generate in a controlled order. First approve the model. Then approve the garment-on-model image. Only after that should you expand scenes and crops. If the product fit is wrong at the base stage, every later image will inherit the problem.
Also separate campaign exploration from product-page assets. Campaign images can be moodier. Product-page images should be clearer, more accurate, and less stylized.
Review automation like a campaign system
Automation is valuable only if the outputs are comparable. Name each generation by product, model profile, pose, scene, and crop. A file named black-jacket_city-crosswalk_medium-shot_v02 is easier to review than a pile of random exports.
Use a review sheet with these columns:
| Column | Why it matters |
|---|---|
| Product accuracy | Confirms the garment shape, color, and visible details |
| Model consistency | Keeps body type, styling, and pose language aligned |
| Scene fit | Checks whether the environment matches price and occasion |
| Motion potential | Marks whether the still can become a clean short clip |
| Placement | Assigns homepage, product page, paid social, or lookbook |
If you are producing an apparel campaign, do not approve the most dramatic image first. Approve the most reusable image first: clear garment, natural pose, good crop, and enough space for the channel. Then build more expressive variants around that anchor.
When a still has strong scene logic but weak product detail, return to AI Image Generator with tighter garment constraints. When it has product accuracy and a natural pose, move it into Image to Video with a small camera move or fabric motion.
For larger catalogs, keep one approved model profile per category. Outerwear, dresses, basics, and activewear often need different pose language, but each category should still have a repeatable review standard.
Try it in Naviya
Upload your garment image to AI Image Generator, define a model profile, and ask for three scene plans. Generate the strongest full-body and medium shots first. Then animate the best image with Image to Video or create paid-social cuts in AI Video Ads.
Quality checklist
Before using the images:
- The garment matches the product photo.
- Fit looks believable on the body.
- The scene supports the product category.
- The pose shows the garment, not only the model.
- Hands, face, and limbs look natural.
- There are no invented logos or text.
- The image can be cropped for product page and social.
Automation is only useful when it stays product-faithful. Define the model, preserve the garment, let the scene serve the product, and review the results with ecommerce discipline.