2026-06-12
Red Black White AI City Promo Video Workflow
Turn city landmark photos into bold red, black, and white AI promo videos with minimalist illustration, FPV camera motion, and short-form editing.
Try this workflow in Naviya
Use the guide to shape a still image, then keep it as a first frame or campaign asset.
Open the studio
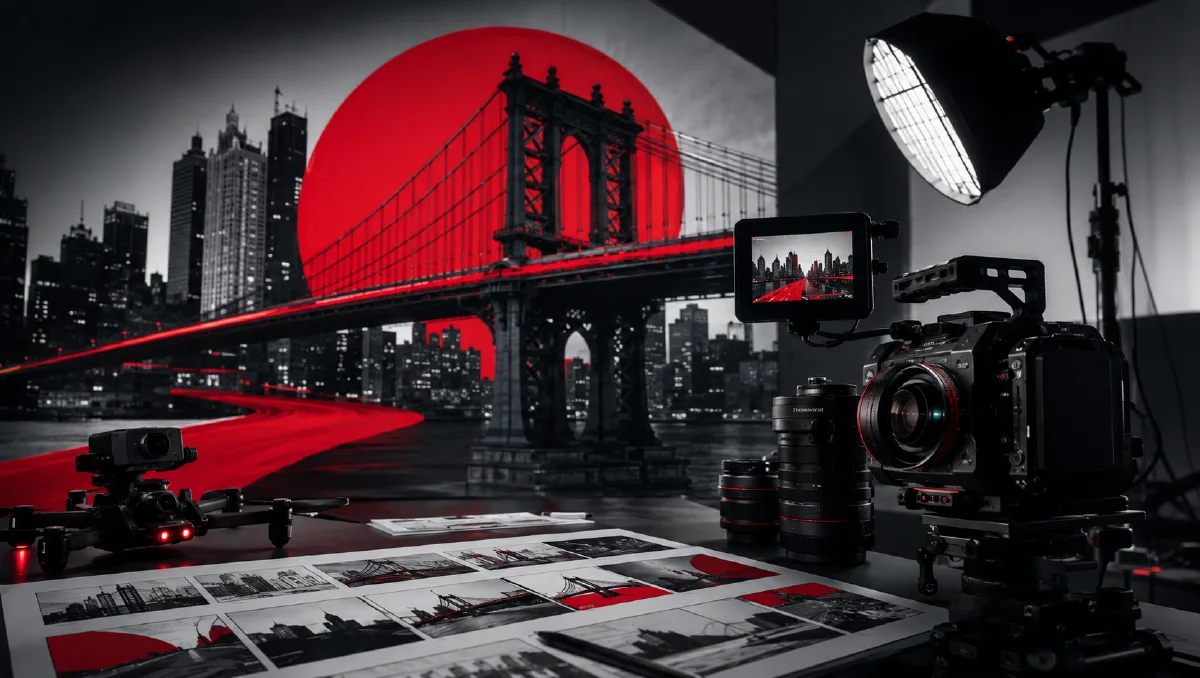
A city promo does not need realistic drone footage to feel memorable. One of the most striking AI approaches is to turn landmarks into a red, black, and white graphic system, then animate the sequence with fast FPV motion, zooms, and first-frame-to-last-frame transitions. The result feels like a poster, title sequence, tourism teaser, and music video at the same time.
This workflow is useful for city branding, local business campaigns, event teasers, travel reels, cultural districts, and personal hometown edits. Use Naviya AI Image Generator to stylize landmark photos, Image to Video to animate each poster frame, and AI Video Ads when the promo needs a campaign structure. For related craft, read AI video camera movement prompts, AI color grading prompts, and AI video prompt guide.
What is the red black white city promo style?
It is a minimalist illustrated city video built from three high-contrast colors: pure red, pure black, and pure white. The image removes ordinary photo detail but preserves architectural silhouettes, skyline shapes, bridge lines, roof geometry, and landmark identities. Motion then gives the graphic system energy.
The style works because the viewer reads the city twice. First, they see a bold abstract composition. Then they recognize the landmark. That combination makes the video feel designed rather than merely generated.
Step 1: collect landmark material
Start with recognizable places. A city promo needs clear icons, not random street corners. Useful material includes:
- cross-river bridges;
- traditional towers or temples;
- old streets and historic facades;
- modern skyscrapers;
- churches, museums, stations, or theaters;
- waterfront skylines;
- street signs or gates with local character.
Choose photos with strong outlines. The tricolor style depends on silhouette, so a clean bridge photo may work better than a busy crowd scene.
Step 2: convert photos into tricolor illustrations
Upload each landmark photo and apply a style prompt that removes clutter while preserving structure.
Image prompt:
Transform this city landmark photo into a minimalist three-color
illustration using only pure red, pure black, and pure white. Preserve
the core silhouette, architectural structure, skyline, and recognizable
landmark features. Remove unnecessary details. Create strong visual
contrast, print-like texture, and bold poster impact. The image should
feel graphic, cinematic, and suitable for a high-energy city promo.
Review the output for recognition. If the landmark becomes too abstract, add "preserve the bridge arches," "preserve the tower roof shape," or "preserve the skyline outline." If it remains too photographic, add "flat graphic blocks, no natural color, no realistic texture."
Step 3: build a sequence, not isolated images
A city promo works best as a chain of locations. Plan the order before generating video:
| Clip | Landmark type | Motion idea |
|---|---|---|
| 1 | bridge | FPV fly-through |
| 2 | old street | forward street rush |
| 3 | tower | quick zoom-in |
| 4 | skyscraper | vertical rise |
| 5 | waterfront | lateral glide |
| 6 | final skyline | hard push to title |
This structure gives the final edit rhythm. Alternate wide icons with tighter details so the viewer does not feel trapped in the same motion.
Step 4: animate each frame
The simplest motion prompts are often enough:
FPV drone shot, flying forward through the street.
Zoom in quickly toward the central landmark.
For stronger results, write motion that matches the architecture.
Bridge prompt:
Create a 4 second FPV drone shot flying rapidly forward along the red,
black, and white bridge illustration. The camera passes under graphic
bridge lines with strong forward momentum. Preserve the three-color
poster style, bold contrast, and landmark silhouette. No realistic color,
no extra buildings.
Tower prompt:
Fast cinematic push-in toward the traditional tower silhouette. The
red and black graphic shapes expand with parallax while the white
negative space stays clean. Sharp poster-like motion, bold contrast,
minimalist city promo energy.
Street prompt:
FPV camera rushes through a stylized old street illustration. Red walls,
black shadows, and white negative space streak past the lens. The shot
feels like a fast title sequence while preserving the graphic landmark
style.
Step 5: use first and last frames for transitions
If your video tool supports first-frame and last-frame control, connect the images:
- Frame 1 to Frame 2: bridge becomes old street.
- Frame 2 to Frame 3: old street becomes tower.
- Frame 3 to Frame 4: tower becomes skyscraper.
- Frame 4 to Frame 5: skyscraper becomes waterfront.
This creates a continuous city journey instead of unrelated clips. Keep each transition short. A two to four second segment is enough.
Editing structure
The final edit should be simple:
- Open with the strongest landmark silhouette.
- Use fast FPV or zoom motion for energy.
- Cut on beats or hard visual changes.
- Alternate forward motion with vertical or lateral motion.
- End on the clearest city symbol or title card.
Sound matters. Choose music with strong percussion, sharp cuts, or suspenseful rhythm. Add subtle whooshes for zooms and transitions.
Common problems and fixes
| Problem | Fix |
|---|---|
| Landmark becomes unrecognizable | add architectural features to preserve |
| Image has too many colors | specify only pure red, pure black, pure white |
| Video becomes realistic | repeat preserve tricolor poster style |
| Motion feels flat | use FPV fly-through, parallax, quick push-in |
| Sequence feels random | plan landmarks in a route-like order |
Try it in Naviya
Upload one landmark photo to Naviya AI Image Generator and create a red, black, and white poster frame. Animate it with Image to Video, then build a five-shot sequence in AI Video Generator for a complete city promo.
Landmark selection scorecard
Score each candidate image before stylizing it. Give one point for a recognizable silhouette, one point for a clean outline, one point for strong local meaning, one point for a camera angle that can support motion, and one point for contrast against the sky or background. Images with four or five points are good candidates. Images with one or two points may still be beautiful photos, but they will probably collapse after the tricolor reduction.
This scorecard keeps the workflow practical. A successful city promo is not made from the most detailed photo. It is made from places that survive simplification and become graphic icons.
Title-card treatment
For the final card, keep the same red, black, and white language. Use a skyline, bridge outline, or map-like shape as the graphic base. Let the city name or event title sit in clean white negative space. Avoid adding many colors or textures at the end, because the title card should feel like the conclusion of the same system.
Color discipline is the whole identity. If one clip introduces grey gradients, natural blue sky, gold light, or realistic street color, the sequence loses its graphic force. Keep exceptions out of the main cut and reserve full-color footage for a separate campaign version.
Final prompt template
Image style:
minimalist red, black, and white city illustration, preserve landmark
silhouette and architecture, remove clutter, bold poster contrast.

Motion:
[FPV fly-through / quick zoom / vertical rise / lateral glide],
strong parallax, high-energy title-sequence feeling, preserve
three-color graphic style, no realistic colors, no extra landmarks.
The key is consistency. Once the city is reduced to a tricolor graphic language, every clip should obey that language. The result is sharper, more memorable, and easier to edit than a set of mismatched realistic clips.