2026-06-12
Outfit Change AI Video Workflow
Create smooth outfit-change videos from one model image and clothing references using virtual try-on, lookbook generation, direct one-take prompting, and edit cleanup.
Try this workflow in Naviya
Use references when identity, product shape, outfit, or style needs to stay consistent.
Try reference to video
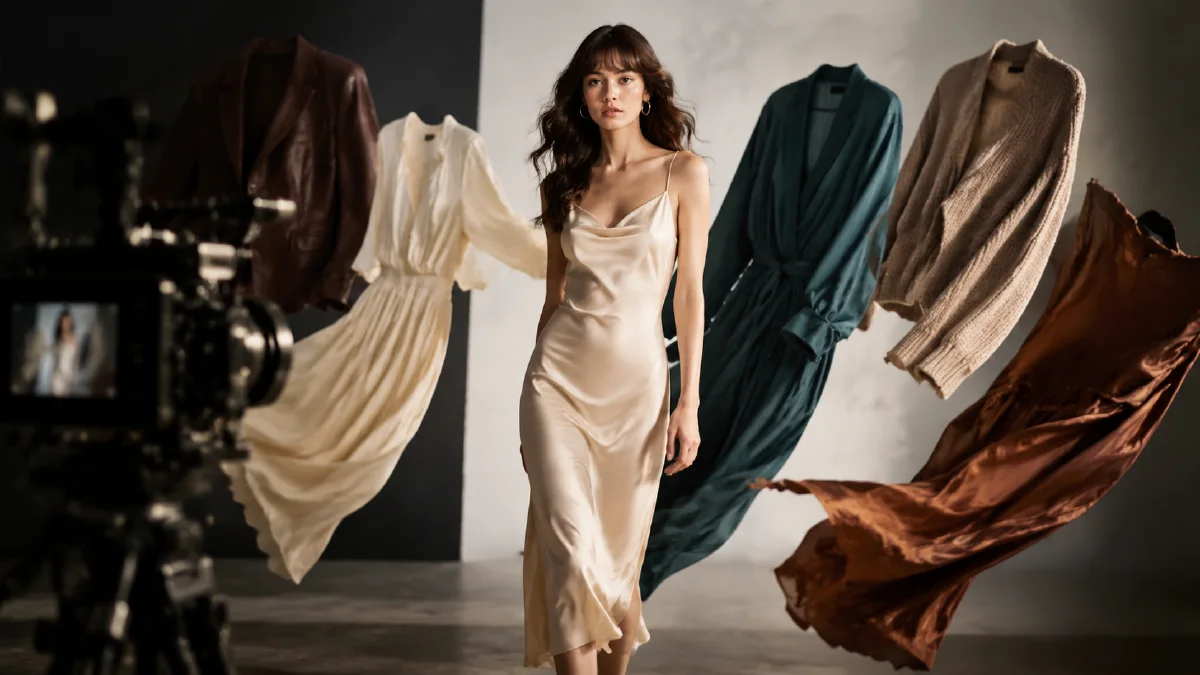
Outfit-change videos are built for short-form platforms. They show transformation quickly, make clothing feel dynamic, and let a brand display several looks without a full shoot. AI makes the format faster, but smooth results require a stable model base, accurate clothing references, and a decision between two production modes: lookbook clips or one-take outfit assembly.
This guide shows both approaches. For adjacent fashion workflows, read AI apparel model workflow, AI fashion product video workflow, and Seedance clothing video styles guide when you want style-specific prompts.
What is an outfit-change AI video?
An outfit-change AI video is a short clip where a model displays, transitions into, or assembles clothing items. It can be used for:
- Lookbook posts.
- Product drops.
- Marketplace listing videos.
- Styling bundles.
- Paid social ads.
- Creator-style try-on content.
The core requirement is continuity. The model, room, camera, and lighting should feel stable while the outfit changes.
Step 1: Create the universal model base
The base model decides the visual quality of the entire video. Generate a full-body smartphone-style image with a simple room.
Prompt:
Full-body smartphone snapshot of a young fashion creator standing in a minimal
white-wall room with wood floor. Natural relaxed expression, gentle vivid smile,
subtle polished makeup, current chin-length bob haircut with airy bangs, full
body clearly visible from head to toe, relaxed open posture. Wearing a simple
black lounge set that can function as a neutral base. Soft natural indoor light,
realistic phone photo texture, no text, 9:16.
Review:
- Face is natural.
- Body is full length.
- Room is simple.
- Pose can support many outfits.
- Lighting is soft enough for product replacement.
Create the base in Naviya image generator.
Mode 1: Precise try-on lookbook
This mode is best when you need a separate clip for each outfit.
Step 2A: Apply one outfit
Upload the base model and clothing reference.
Replace the model's outfit with the clothing from the reference. Show the full
body. Preserve garment color, fabric texture, silhouette, waistline, sleeve
shape, logo, buttons, and layering. Keep the same model, room, lighting, and
smartphone framing.
Generate one approved still per look.
Step 3A: Animate the look
Use a motion prompt:
Using the model and room as the subject, create a short full-body fashion
display video. The model makes several natural poses that match the outfit:
slight turn, hand on waist, small step, relaxed smile. Expression changes
naturally. No text, no sudden scene cuts, product details remain stable.
Repeat for each look, then edit the clips together with "Look 1", "Look 2", or clean transition cards if needed.
Mode 2: Direct one-take outfit assembly
This mode is best for a transformation clip where the model appears to show and put on pieces in sequence.
Inputs:
- Base model image.
- Clothing reference image.
- Optional reference motion video.
Prompt:
Create a smooth one-take outfit-change video using the model and room as the
main subject. Follow the reference motion rhythm, but only show the clothing
items from the product reference. The model displays and puts on the pants,
shoes, inner layer, and outer layer in sequence. The movement should match the
music rhythm but should not feel chaotic. Natural expression, stable room,
no text, no unrelated clothing.
This direct mode is faster, but it is less predictable. Use it when you can accept cleanup in editing.
Which mode should you choose?
| Need | Better mode |
|---|---|
| Accurate ecommerce product display | Precise try-on lookbook |
| Multiple clean listing videos | Precise try-on lookbook |
| Viral transformation effect | Direct one-take |
| Strong control over each outfit | Precise try-on lookbook |
| Fast creative experiment | Direct one-take |
| Fewest product detail errors | Precise try-on lookbook |
Most brands should produce the lookbook clips first, then test a one-take version for social reach.
Step 4: Edit the result
For lookbook mode:
- Order looks by contrast.
- Use one transition style.
- Keep each clip long enough to see the garment.
- Add minimal labels only if they help the viewer.
- Match color and exposure across clips.
For one-take mode:
- Remove chaotic or inaccurate moments.
- Keep the strongest transformation beats.
- Cut to the rhythm of the music.
- Freeze or slow the clearest final outfit frame.
- Add product detail cutaways if needed.
Use Naviya image-to-video for controlled lookbook clips and Naviya video generator for direct generation experiments.
Prompt rules that reduce failure
- "Full body visible" for every still.
- "Same model, same room, same lighting" for continuity.
- "Preserve garment details" for product accuracy.
- "No text" to avoid random captions.
- "One action at a time" for cleaner motion.
- "Natural expression changes" for less mannequin-like output.
If product references include multiple items, list them clearly:
Only use these items: [pants], [shoes], [inner top], [outer jacket]. Do not add
other clothing. Keep colors and shapes from the references.
Transition ideas
Use one transition concept per video. Too many tricks make the product hard to inspect.
| Transition | How it works | Best for |
|---|---|---|
| Step change | Model steps forward and look changes | Shoes, pants, full outfits |
| Hand wipe | Hand passes across lens | Jackets, tops, accessories |
| Spin | Model turns once into new outfit | Dresses, coordinated sets |
| Drop-in | Item appears in hand, then on body | Layered looks |
| Beat pose | Outfit changes on music hit | Fast social edits |
Prompt example:
The model steps forward on the music beat. As the foot lands, the outfit changes
into the next referenced look while the room, body, face, and camera remain
stable. The transition feels smooth and intentional, not chaotic.
If accuracy matters more than the effect, use lookbook mode and add transitions in editing. If entertainment matters more, test one-take transformation.
Product sequencing
The order of clothing items changes how the video feels. For a complete outfit, build from base to outer layer:
- Pants or skirt.
- Shoes.
- Inner top.
- Shirt or sweater.
- Jacket.
- Bag or accessory.
This order feels natural because it follows how people get dressed. If the hero product is a jacket, reveal it last. If the hero product is shoes, open with a foot-level moment and return to the shoes at the end. The sequence should make the hero item memorable, not bury it among too many changes.
When to stop generating
Stop once you have one clean full-body look, one clean transformation moment, and one product detail frame. More generations can create options, but they can also dilute the edit. A short outfit-change video should feel clear within seconds.
For product teams, archive the approved base frame and final look frames so the next seasonal drop can reuse the same visual language.
Try it in Naviya
Create the model base and try-on frames in Naviya image generator, then animate lookbook clips with image-to-video. For social ad tests, build direct transformation variants in Naviya AI video ads.
Final checklist
- The base model is full-body and reusable.
- Clothing references are clean and product-specific.
- Each look has an approved still before animation.
- The model identity and room stay consistent.
- Product details are readable in the final cut.
- The edit removes unstable transformation moments.
Outfit-change videos are most reliable when the transformation is planned as a sequence of stable looks. Build control first, then add speed.