2026-06-12
AI Foam Effects for Skincare Product Images
Learn how to add realistic foam effects to cleanser and skincare product visuals with mask planning, density control, prompt templates, and QA checks.
Try this workflow in Naviya
Use the guide to shape a still image, then keep it as a first frame or campaign asset.
Open the studio
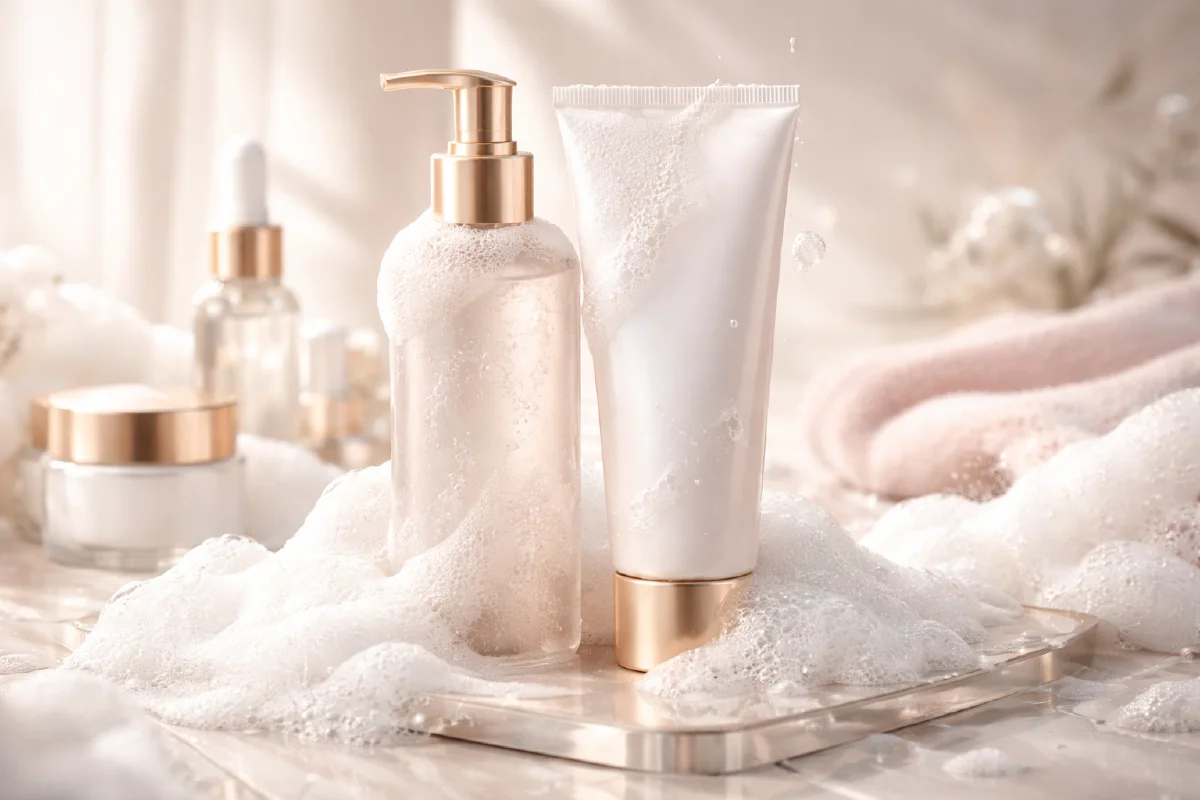
Foam is a small detail that can make a cleanser image feel tactile, fresh, and active. It signals lather, softness, cleansing power, and a product in use. The challenge is that foam can also look fake quickly: hard bubbles, random white blobs, dirty edges, or foam that hides the product label. A good AI foam workflow uses a simple mask to tell the model where foam should appear and how dense it should be.
This guide explains how to plan foam effects for skincare product images, especially cleansers, face washes, body washes, and soap-based products. You can pair it with AI product scene generation, AI lighting prompts, Naviya's AI Image Generator, and Image to Video when you want foam to move gently in a short social clip.
What an AI foam mask does
An AI foam mask is a temporary guide layer that marks where bubbles should be generated. In many workflows, creators draw bright green dots or strokes over a product image. Dense marks tell the model to generate thick foam. Sparse marks tell it to create light bubbles, residue, or scattered particles.
Think of the mask as foam choreography:
| Mask pattern | Likely result |
|---|---|
| Dense rounded cluster | Thick creamy foam. |
| Soft scattered dots | Light bubble particles. |
| Thin edge strokes | Foam clinging to a bottle edge or skin edge. |
| Random hard square marks | Unnatural blob shapes. |
| Marks over the label | Product information may be covered. |
The mask should not be decorative. It should describe where the foam belongs physically. Foam gathers in creases, along product edges, on wet skin, around the pump or cap, and in areas touched by water. It rarely floats in perfectly even dots across empty air unless you are making a stylized beauty poster.
Choose a clean base image
Start with a product image that already feels professional. Free stock-style skincare images can work for practice, but commercial assets should use your product or approved campaign photography. The base should have clear lighting, enough resolution, and a product label that remains readable after editing.
Before adding foam, fix the image:
- Remove dust, scratches, and stray marks.
- Straighten the product if it leans unintentionally.
- Clean the background.
- Decide whether the foam should touch the product, the model's skin, a sink, water, or a tabletop.
- Duplicate the file so the mask work stays reversible.
If the product has a transparent bottle, avoid covering the entire surface. Foam over transparent packaging can confuse the model and make the bottle look opaque.
Draw the foam density map
Create a new transparent layer above the base image. Use a pure bright green such as #0eff0a for the guide marks. A splatter brush is useful because real foam is irregular, but control matters more than randomness.
Use three density levels:
| Zone | How to draw it | Purpose |
|---|---|---|
| Primary foam | Dense, rounded, overlapping marks | Main lather area. |
| Edge foam | Medium dots following product or hand edges | Makes the effect attach to the scene. |
| Mist foam | Small sparse dots | Adds realism without hiding the product. |
For a cleanser tube, the primary foam might sit around the cap and lower body. Edge foam can follow one side of the tube. Mist foam can drift onto nearby water droplets or a clean surface. Keep the label clear unless the campaign intentionally wants a sensory close-up rather than a readable product shot.
The most common mistake is drawing too many uniform dots. Real foam has clusters, gaps, tiny bubbles, and soft transitions. Vary brush size and spacing. If the result looks like decorative confetti, simplify the mask and make the cluster shape more natural.
Foam generation prompt template
Use a direct instruction:
Convert the green guide marks into realistic soft white cleansing foam.
Preserve the original product shape, label, lighting, and background.
Foam should follow the marked density: thick creamy lather in dense areas, small scattered bubbles in sparse areas.
Natural wet texture, soft edges, translucent bubbles, realistic highlights, no text changes, no extra logos.
For a beauty ad version:
Create a premium skincare product image with realistic cleansing foam generated only where the green marks appear.
The foam is soft, airy, and wet, with varied bubble sizes and gentle highlights.
Keep the bottle label readable, preserve the product color and cap shape, clean studio lighting, fresh beauty campaign style.
For an ingredient-led image:
Turn the green marks into gentle foam and micro bubbles around the cleanser.
Add subtle water droplets and clean reflections, but keep the product hero sharp and readable.
Fresh bathroom-counter mood, soft daylight, realistic skincare advertising image.
If your first pass creates hard foam, ask for "softer rounded edges, finer bubble texture, more translucent foam." If there is too little foam, expand the mask rather than writing a louder prompt. Mask density is the strongest control.
Troubleshooting foam effects
| Problem | Likely cause | Fix |
|---|---|---|
| Foam looks like shaving cream | Mask too dense and prompt too heavy | Reduce density and ask for varied micro bubbles. |
| Foam is too hard | Mask edges are angular | Paint rounder, softer clusters. |
| Product label disappears | Foam marks cover the label | Clear the label area and regenerate. |
| Bubbles float away | Marks are detached from surfaces | Anchor dots to cap, edge, hand, waterline, or tabletop. |
| Background warps | Prompt asks for too much scene change | Preserve background and limit generation to foam. |
The fastest improvement usually comes from editing the mask, not from adding more adjectives. If foam should be soft, the mask should already be soft. If foam should be scattered, the marks should be scattered.
Turn foam into motion
Foam works well in short product videos because it gives the frame a tactile movement cue. Use subtle animation: bubbles expanding slightly, water droplets sliding, a slow camera push, or foam drifting around the cap. Avoid explosive foam unless the brand style is playful.
Motion prompt:
Subtle skincare product video from the uploaded foam image.
Tiny bubbles gently expand and shimmer, a few water droplets slide slowly on the surface.
The product stays sharp and readable, soft beauty lighting, clean background, slow camera push-in.
For more movement vocabulary, read AI video state flow prompts and image-to-video troubleshooting.
Foam effect evaluation rubric
A foam effect should make the product benefit easier to understand, not bury the packshot. Review each output against four practical criteria. First, the product silhouette should remain readable at thumbnail size. If the bottle, tube, or jar disappears into the foam, reduce foam density around the label area. Second, the foam should have believable material behavior: small bubbles near contact points, soft collapse around edges, and slightly uneven thickness. Perfectly smooth white blobs often feel like plastic, not skincare texture.
Third, the foam pattern should guide attention. A diagonal sweep can lead the eye toward the logo. A circular mask can frame the cap or applicator. A soft background bed can make a hero pack look clean without covering it. Fourth, the color temperature should match the brand. Cool white foam feels clinical and fresh. Warm cream foam feels gentle and nourishing. Do not mix both unless the product concept needs contrast.
For ecommerce, save three deliverables from each useful generation: a clean hero, a cropped detail, and a banner-safe version with empty space. Use the AI image generator for controlled stills, then test gentle motion in image to video if the foam needs to expand, slide, or settle. The white background product banner workflow is useful when the final asset must stay retail-clean rather than cinematic.
Try it in Naviya
Create a clean product still in Naviya's AI Image Generator, then use a guided foam prompt to build a tactile beauty image. When the still is approved, animate it with Image to Video. Keep the product label, foam density, and surface realism visible at mobile size before using the asset in a campaign.