2026-06-12
Batch Fashion Ecommerce Image Workflow for Fast SKU Launches
Use AI to batch-generate fashion ecommerce images with model setup, outfit analysis, scene matching, mid shots, full-body shots, and macro details.
Try this workflow in Naviya
Turn a product, hook, or campaign idea into short social-ready ad concepts.
Create video ad variants
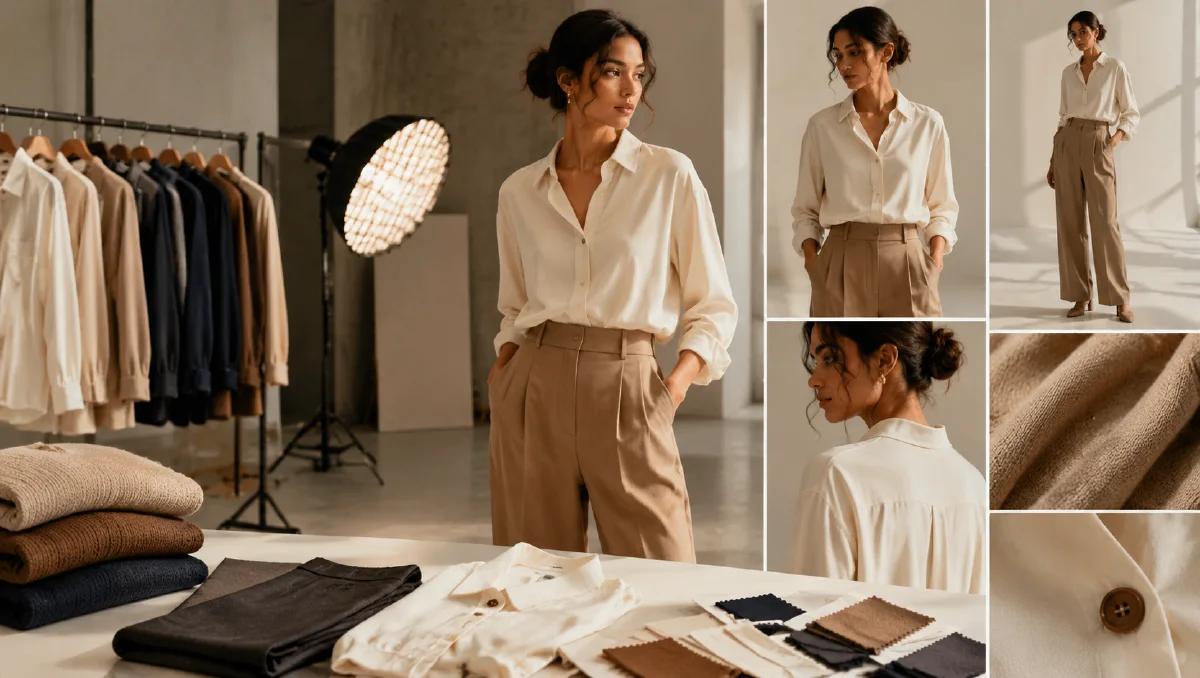
A batch fashion ecommerce image workflow creates a full set of product images from a garment photo. Instead of generating one hero image, the workflow outputs a structured mix: mid shots, full-body shots, and macro details. This is the kind of image coverage fast-moving ecommerce needs for product pages, ads, and marketplace listings.
The method is built around automation, but the output should still feel like a planned shoot. A good batch set looks as if it happened in one location with one styling direction, not as if each image came from a different world.
Use AI Image Generator for stills, Image to Video for short product clips, and AI Video Ads for campaign variants. Related guides include AI model product scene automation, ecommerce AI model photos, AI lookbook from single product image, and AI flat-lay outfit poster workflow.
Definition
Batch fashion ecommerce image generation is the automated creation of multiple product images for one SKU. The set usually includes:
- Mid shots that focus on the garment.
- Full-body shots that show fit and styling.
- Detail shots that show fabric, collar, cuff, hem, stitching, and texture.
The goal is to cover shopper questions quickly: What does it look like? How does it fit? What is the material like?
Step 1: Define the digital model
Use a clear model profile:
Model profile:
Age range:
Gender presentation:
Body type:
Skin tone:
Hair:
Pose attitude:
Brand mood:
Generate or select a model that matches the buyer. For a batch workflow, consistency is more important than novelty. One stable model makes the image set feel coherent.
Step 2: Analyze the garment
Upload the product image and ask AI to identify:
- Garment type.
- Fabric.
- Fit.
- Main color.
- Pattern.
- Styling role: outerwear, top, bottom, dress, accessory.
- What must be shown in detail.
Prompt:
Analyze the uploaded garment for ecommerce image planning.
Identify garment type, fabric, fit, color, pattern, styling role, and key details.
Then recommend a complete outfit that supports the garment without hiding it.
If the garment is a pair of pants, the workflow should choose a top and shoes. If it is a sweater, it should decide whether to show it tucked, layered, or relaxed.
Step 3: Lock the master location
A master location keeps the set consistent. It can be a villa, studio, street corner, loft, beach house, or neutral showroom. Once chosen, all images should feel like they belong there.
Master location prompt:
Create one master location for a fashion ecommerce shoot.
Garment mood: [casual, resort, workwear, street, premium, outdoor].
Location: [specific setting].
Lighting: [soft daylight, overcast, studio, golden hour].
Background rule: supports the garment and never hides it.
Use this location consistently across all shots.
Step 4: Generate the image set
A practical output ratio:
| Image type | Count | Purpose |
|---|---|---|
| Mid shots | 4 | Product focus and conversion |
| Full-body shots | 2 | Fit, styling, and movement |
| Macro details | 6 | Fabric, seam, collar, cuff, closure |
Mid-shot prompt:
Create a fashion ecommerce mid shot.
Model: [profile].
Garment: use the uploaded garment and preserve all details.
Location: [master location].
Crop: mid shot, upper body or relevant product area, product clearly visible.
Pose: natural, conversion-focused, not stiff.
Constraints: accurate garment color, fit, pattern, seams, and material. Natural hands. No fake text.
Full-body prompt:
Create a full-body ecommerce fashion image.
Show the complete outfit and garment fit.
Pose: walking, hands in pockets, or relaxed movement.
Location and lighting: match the master location.
Constraints: product remains the hero, no distortion, no hidden garment details.
Macro prompt:
Create a macro ecommerce detail image.
Detail: [collar, cuff, zipper, pocket, knit texture, hem, fabric surface].
Camera: close-up with shallow depth of field.
Lighting: realistic and clear.
Constraints: preserve material texture and construction, no invented features.
Step 5: Review as a product page
Do not judge each image alone. Review the set:
- Does it answer fit, style, and material questions?
- Do images feel like one shoot?
- Does the garment stay accurate?
- Are there enough detail images?
- Does the main image grab attention?
- Can the set support mobile shopping?
Output naming and selection
Batch workflows can create a lot of images quickly, so name and select outputs as you go:
| File type | Naming idea |
|---|---|
| Main image | sku-main-midshot-01 |
| Full-body | sku-fullbody-walk-01 |
| Detail | sku-detail-cuff-01 |
| Alternate | sku-alt-model-01 |
| Reject | sku-reject-fit-issue |
Keep a rejection reason. If five images fail because the collar changes, the next prompt should mention collar preservation. If the model pose hides the hem, change the crop. Selection notes make the next batch better.
Practical batch size
Start with a small batch before scaling. Generate one mid shot, one full-body shot, and two details. If those pass product accuracy, expand to the full set. This avoids wasting time on a broken model, wrong location, or misunderstood garment.
Human review still matters
AI can create the batch, but a merchandiser should approve the final set. Check size perception, color, fit, and whether the main image matches the product page promise. If one image is more artistic but less accurate, keep it for social and choose the clearer image for ecommerce.
Batch QA and retouching workflow
Batch generation is useful only if the set feels consistent on a product grid. Review images together, not one by one. Put the outputs into a simple contact sheet and check model identity, garment shape, hem length, sleeve position, fabric texture, lighting direction, background height, and crop. A single beautiful image can be rejected if it breaks the rhythm of the page or makes the garment look like a different item.
Use three review passes. The first pass is identity and garment accuracy. Remove anything with changed proportions, missing details, distorted hands, or inconsistent fabric. The second pass is merchandising quality. Keep images that help a shopper understand fit, material, styling, and occasion. The third pass is layout readiness. Select crops that work across category cards, product detail pages, email banners, and social previews.
For larger batches, create naming rules before exporting: product-name_angle_variant_status. Example: linen-jacket_front_clean_approved or linen-jacket_detail-cuff_review. This prevents approved images from being lost among experiments. If an image is close but not final, write a short note such as "keep pose, reduce background contrast" so the next generation has a clear target.
Use the AI image generator for controlled batch stills, reference to video if a campaign needs motion from selected looks, and image to video for hero clips. For landing page context, pair this with the fashion landing page workflow.
Try it in Naviya
Upload a garment image to AI Image Generator. Generate one model, one master location, four mid shots, two full-body shots, and six macro details. Use Image to Video for one short product-page clip if the main image is strong.
Batch workflow checklist
Input image clean? yes/no
Model profile defined? yes/no
Outfit plan generated? yes/no
Master location locked? yes/no
Mid shots: 4
Full-body shots: 2
Macro details: 6
Product accuracy approved? yes/no
Mobile crop approved? yes/no
Batch AI generation is most useful when it produces a complete selling set. Plan the model, outfit, scene, and shot ratio first, then generate with ecommerce discipline.